Healthy Life Heather

  • Home
  • Heather
    • About Me
    • Contact
    • Disclaimer
  • Healthy Living
  • Wellness Journey
  • Resources
  • Facebook
  • Twitter
  • Instagram
  • Pinterest

3 ways to cook butternut squash

March 17, 2015 by Heather Leave a Comment

Disclosure: This page contains affiliate links.

3 ways to cook butternut squash

I never thought I’d say it, but butternut squash is one of my favorite foods. Maybe in the top 10.

Butternut squash (oven-roasted, bite-sized, puréed, sweet, savory, you name it) has been a staple in my diet since starting the GAPS diet and then transitioning to Paleo(ish) in the summer of 2014. Since last May, there’s probably only been 10-15 days where I haven’t had eaten butternut squash in some form during the course of the day.

But I wasn’t always a butternut squash fan. In fact, I didn’t even know what it was until I lived in Australia for a year. Even then it took me months to learn that what Aussies called “pumpkin” (or sometimes “butternut pumpkin”) was what we’d call “butternut squash” in the USA. When I returned home after the year in Australia, I ate butternut squash occasionally but still MUCH preferred sweet potatoes as my slightly sweet starchy carb of choice.

And then the health problems hit and hit hard. While researching my symptoms and various diets, I decided that sweet potatoes would sadly have to sit on the sidelines for a while. Butternut squash became my primary source of carbs, and other than bananas, it continues to be my main source of carbs nearly nine months later. Over time, I’ve found different ways of incorporating it into meals and snacks, and I hope it’s never taken off the list of foods I’m able to eat!

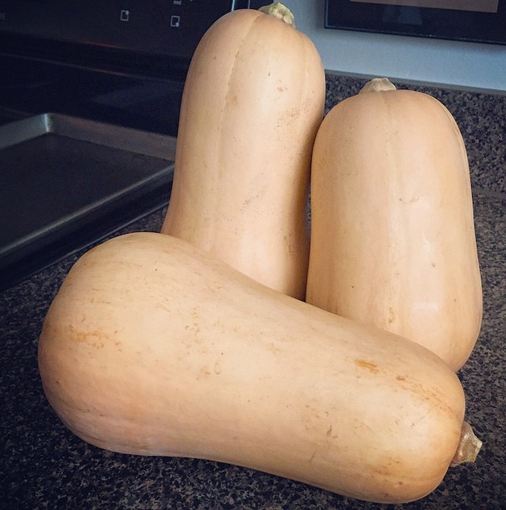
Recently a few friends and family members who are exploring Paleo, eating less processed foods, or simply seeing me post about butternut squash on Facebook all of the time asked how I prepare it. After nine months of buying one to three butternut squash per week, I realized I take for granted how easy it is to prep and cook! I’m going to share three methods I’ve tried, along with recipes featuring some of my favorite ways to get my daily butternut fix.

Learn 3 different ways to cook butternut squash, including a version with no slicing or dicing!

How to roast butternut squash (halves)

Without a doubt, slicing a butternut squash in half and roasting the two halves in the oven is my favorite way to prepare butternut squash. It works for just about any recipe and requires the least amount of time from start to finish of all three methods.

Slicing through them isn’t always easy, however, especially if you don’t own a good knife. If you can only invest in a couple of new kitchen items, get a good knife. It’ll make your life SO much easier (as will a husband who does 90% of winter squash prep — he’s our hand and knife model below).

1. Grab your butternut squash, knife, and cutting board of choice.
2. Slice the top and bottom off and stand the butternut squash vertically with the larger, bulbous end on the cutting board.
3. Slice the butternut squash in half lengthwise.

"Oven-roasted butternut squash halves -- slice in half, scoop out seeds, brush with oil, place face down on baking tray, and bake

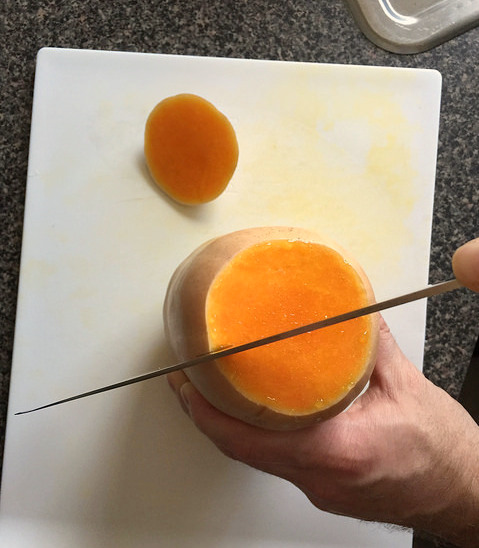
Congrats! The hard part is done.

Oven-roasted butternut squash halves -- slice in half, scoop out seeds, brush with oil, place face down on baking tray, and bake

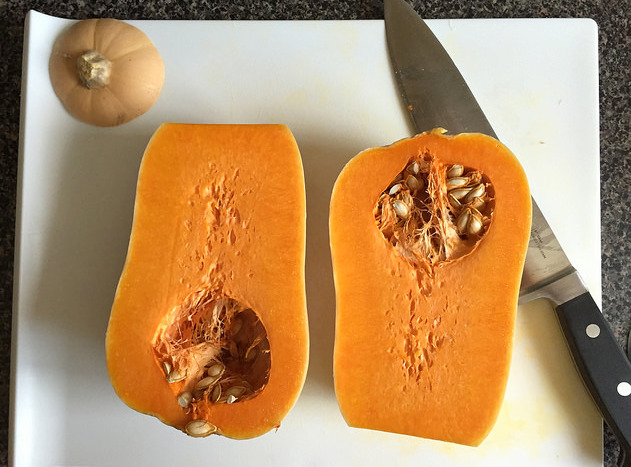
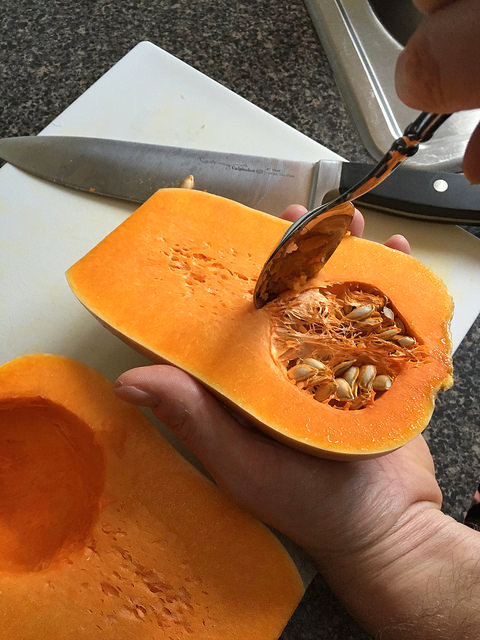
4. Scoop out the seeds (like you would with a carving pumpkin for Halloween). I use a large soup spoon.

Oven-roasted butternut squash halves -- slice in half, scoop out seeds, brush with oil, place face down on baking tray, and bake

5. Brush both halves lightly with olive oil (or cooking fat of choice) and lay face down on a baking tray lined with parchment paper (we use this one).

6. Place tray into an oven pre-heated to 375 F. Cook time will vary based on the size of your squash. We usually set the timer for 40-45 minutes, check the squash, and add on 5-minute increments as necessary. Your squash is done when you can easily pierce it through with a knife.

7. Allow the squash to cool enough to handle. Scoop out flesh and use as directed by your recipe of choice. We’ve been LOVING the butternut squash sauce in this Creamy Sausage and Butternut Squash Spaghetti (using spaghetti squash). Instead of cubing the butternut squash as directed by the recipe, we just use the flesh from roasted halves, as it all gets blended for the sauce anyway!

Peel, cut, cube, and roast butternut squash

Although time consuming, slicing a butternut squash into cubes is a popular method. You can enjoy the bite-sized roasted squash pieces as a side dish, on top of a salad, in soups or stews, or countless other recipes.

We’ve tried several ways of prepping the squash before peeling and cubing and this is what works best for us.

1. Begin as we did with the butternut squash halves — slice off the top and bottom, cut in half lengthwise, and scoop out the seeds.
2. Place each half face down on a cutting board and peel/scrape/cut the skin away, removing as little flesh as possible.

Cut and peel butternut squash, cut into cubes, add oil and herbs of choice, and roast in the oven for a delicious side dish or salad topping

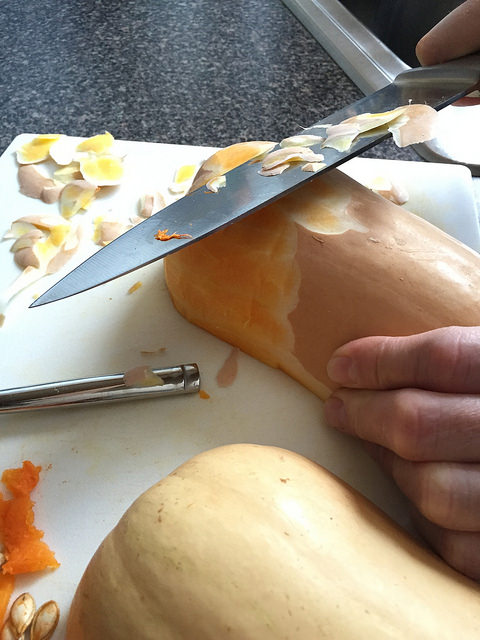
It may take a while to get to a naked half, but once you’ve done it, you’re half way there!

Cut and peel butternut squash, cut into cubes, add oil and herbs of choice, and roast in the oven for a delicious side dish or salad topping

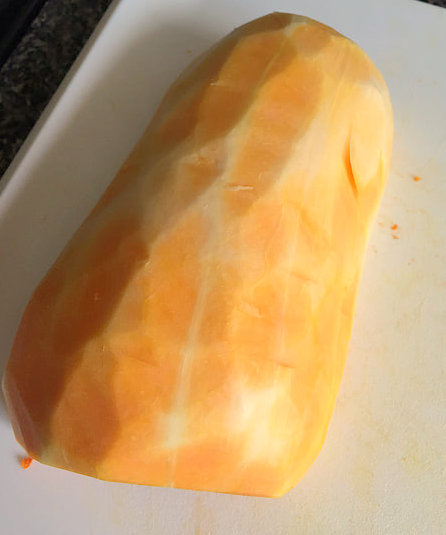
3. Cut the butternut squash into cubes or randomly sized chunks. I prefer fairly small 1/2 inch cubes. They cook faster and get a nice caramelization on them.
4. Toss with olive oil (or cooking fat of choice) and season with salt and pepper (to taste) and any other herbs or spices you like.
5. Spread evenly over a baking tray lined with parchment paper and bake at 375 F. We cooked the gorgeous bites below for 35 minutes. Stir/flip the pieces at least once during roasting for a more even cook and color.

Cut and peel butternut squash, cut into cubes, add oil and herbs of choice, and roast in the oven for a delicious side dish or salad topping

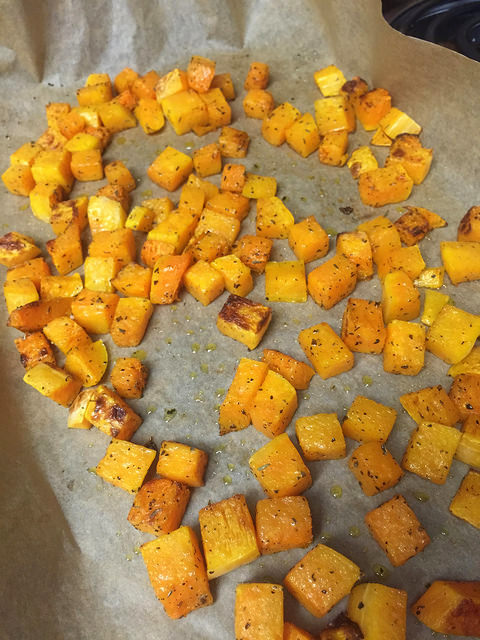
We topped a spinach salad with the butternut pieces above, but at the moment my favorite bite-sized butternut recipe is this roasted butternut squash with paprika and turmeric. YUM.

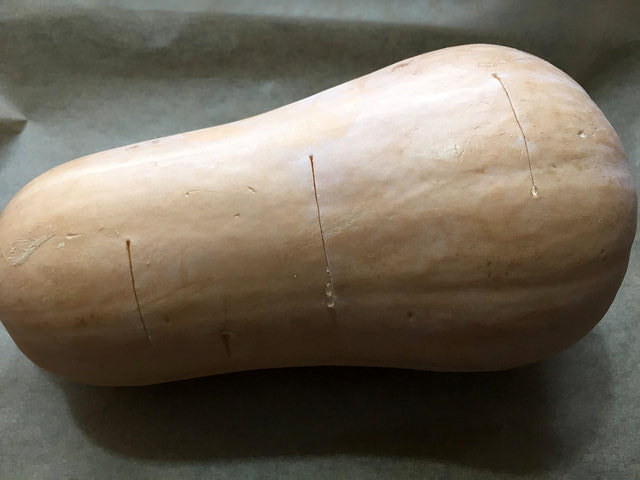
Roast a whole butternut squash in the oven

If you’re not up for peeling, cubing, or even slicing a butternut squash, this is the method for you.

1. Pierce your butternut squash with a large knife in 3-5 spots (depending on the size).
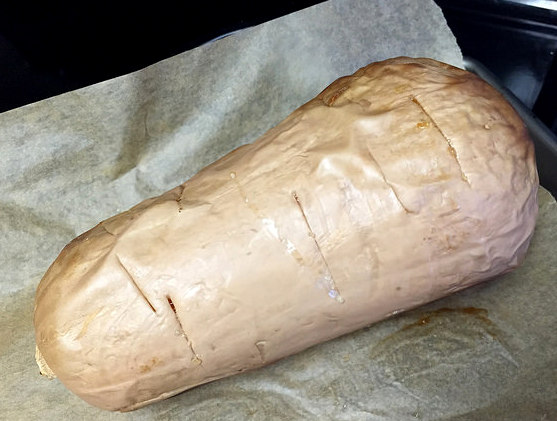
2. Place on a baking tray lined with parchment paper and pop into an oven preheated to 375 F.

How to cook a whole butternut squash in the oven -- no cutting until it has cooked!

3. Rotate the squash every 20 minutes or so to achieve a more even cook and avoid burning the bottom.
4. The first time we tried this method, we took our butternut out at 65 minutes, thinking it was ready. While cooked through, it wasn’t as soft as I would like. I recommend setting your timer for 1 hour for a smaller squash and adding 5-minute increments as necessary. You may need up to 90 minutes for a larger squash.

How to cook a whole butternut squash in the oven -- no cutting until it has cooked!

5. Allow the cooked squash to cool enough to handle and slice in half. Scoop out the seeds. Remove flesh and use in recipe of choice.

How to cook a whole butternut squash in the oven -- no cutting until it has cooked!

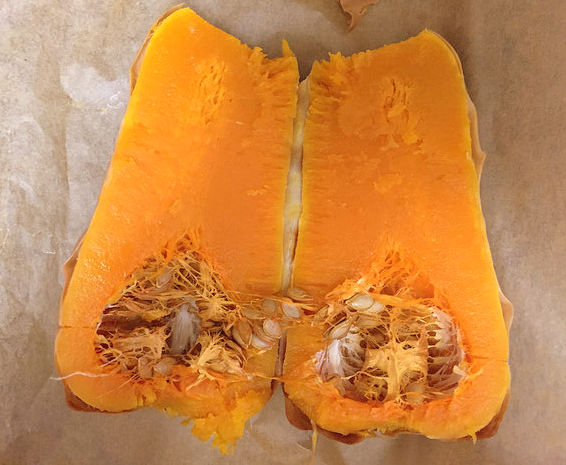
I added the butternut above to a food processor and used the mash/puree to top my favorite winter squash shepherd’s pie recipe (which I make with several modifications for my food allergies + intolerances).

Roasted butternut squash
 
Save Print
Prep time
5 mins
Cook time
40 mins
Total time
45 mins
 
My favorite way to prepare butternut squash -- roasted halves.
Author: Heather
Ingredients
  • 1 butternut squash
  • 2-3 teaspoons of liquid/melted cooking fat (I use olive oil)
Instructions
  1. Preheat oven to 375 F.
  2. Grab your butternut squash, knife, and cutting board of choice.
  3. Place the butternut squash on the cutting board length wise and slice the top and bottom off (about ¼ to ½ inch, just enough to remove the stalk).
  4. Stand the butternut squash vertically with the larger, bulbous end on the cutting board. Slice the butternut squash in half lengthwise.
  5. Scoop out the seeds (like you would with a carving pumpkin for Halloween).
  6. Brush both halves lightly with olive oil (or cooking fat of choice) and lay face down on a baking tray lined with parchment paper.
  7. Place tray into pre-heated oven. Cook time will vary based on the size of your squash. For a medium-size squash, I recommend setting the timer for 40-45 minutes. Then, check the squash and add on 5-minute increments as necessary. Your squash is done when you can easily pierce it through with a knife.
  8. Remove from oven when done and allow the squash to rest until it's cool enough to handle.
  9. Scoop out flesh and enjoy in your recipe of choice.
3.3.3070

If you’ve never cooked a butternut squash, I hope you’ll use one of the methods above and roast one soon! If you’re a fellow butternut squash fan, what’s your favorite method? Any recipes you absolutely LOVE?

Learn 3 different ways to cook butternut squash, including a version with no slicing or dicing!

Filed Under: healthyliving Tagged With: recipe

So what can you eat?

March 10, 2015 by Heather 5 Comments

What can I eat | Healthy Life Heather

One of the questions I’m asked most frequently is “what in the world CAN you eat?!”

When I first eliminated gluten, dairy, and soy, people wondered if I had enough food options remaining. I had plenty!

Nowadays, as I work on healing longstanding gut-health issues with a strict diet, people express concern over what is left for me to eat. Still plenty! When you have as many restrictions as I do, you have to focus on what you CAN eat versus what you CAN’T.

What’s safe and what’s not

As of today, here’s my safe, unsafe, and up-for-debate list of foods. Most of the time I’m happy to be dedicated to following this list, as I’m starting to have good days again! Once in a while I feel frustrated and discouraged. The emotional, mental, and physical strain of chronic illness sets in, and I long for eggs and mango, two of my favorite foods.

Nevertheless, I realize how incredibly fortunate I am to have access to safe and bountiful amounts of food. I’m so grateful for what I can and do have.

foods-to-avoid

  • gluten
  • dairy (including ghee)
  • soy
  • refined cooking oils
  • refined sweeteners (though I have been sneaky and had cane sugar in some otherwise allowed treats)
  • grains (even gluten-free ones — and no rice, corn, or oats in particular)
  • legumes (beans, lentils, peanuts)
  • starchy tubers (white potatoes, sweet potatoes, taro, cassava/yuca, etc.)
  • apples, stone fruit (avocado, apricot, cherries, mango, plums, peaches, etc.), watermelon
  • mushrooms
  • brassica family vegetables, like cruciferous veggies and cabbages (I know I can’t handle kale, cauliflower, broccoli, or brussels sprouts)
  • coconut (flour, oil, milk, sugar)
  • eggs (both the whites and the yolks)
  • bayleaf, cloves, cumin, dill, horseradish, oregano
  • clams, oysters

foods-to-eat

Fruit

  • bananas, berries, citrus
  • dates, figs, and prunes (although high-FODMAP (see below), these seem to be just fine for me in small quantities once in a while)

Vegetables

  • spinach and greens not in the brassica family
  • zucchini and summer squash
  • winter squash, especially butternut, spaghetti, and acorn squash
  • carrots
  • bell peppers
  • tomatoes
  • peas and green beans (though considered legumes, these work well for me)
  • onion, garlic, shallots (thankfully these are the one group of high-FODMAP foods that I’m able to eat with no problem)

Meat
We choose meat from animals that weren’t raised with hormones or antibiotics. When possible, we select grass-fed, pastured, and/or local sources.

  • chicken
  • turkey
  • pork
  • beef
  • bison
  • lamb

Seafood
While I eat salmon once a week, I rarely eat other types of seafood. I’m sure there’s more I could eat.

  • wild-caught Alaskan salmon
  • shrimp
  • tuna (I buy a brand of skipjack tuna which is said to have less mercury)

Nuts and seeds
I seem to be fine with all nuts and seeds except peanuts and perhaps cashews. Almonds and hazelnuts are both considered high-FODMAP but I am fine with both in moderate amounts. I especially like chia seeds, flax seeds, and sunflower seed butter (i.e., sunbutter).

Fats

  • Extra virgin olive oil (EVOO)
  • Lard (we use leaf lard from pastured pigs from a local farm)
  • Tallow (similar to lard but it comes from cows — our source is also pastured and local)

Sweeteners

  • honey (usually raw and often local)
  • maple syrup and maple sugar
  • stevia (I use a few drops of liquid stevia from time to time)

foods-in-question

Quinoa
Though it’s a seed and not a grain, it can behave like a grain. I removed it last summer and recently reintroduced 1/4 cup with no problems. I’m waiting until early summer to try again — if it goes well, I’ll see if I can have a small amount of quinoa once a week.

Plantains
Plantains offer a wonderful source of resistant starch, but starch and I haven’t been on the best of terms the past couple of years. While tubers are still on the “cannot tolerate” list, plantains seem to be fine if I eat small amounts from time to time. I’ve had them once a month for the last three months and I’m hoping this trend can continue.

Cashews
I don’t eat cashews often, but when I have over the last few months, I’ve never had a problem. Until last time. I soaked cashews for a few hours before blending them into a wonderful “cheese” sauce for a paleo lasagna — my first lasagna in I can’t tell you how long. And it was heavenly. But within an hour or two I didn’t feel so great. I thought every ingredient in the dish was safe, so I shrugged it off. When I had leftovers the next day, the same thing happened again. Puzzled, I revisited lists of high-FODMAP foods, and wouldn’t you know, cashews were listed.

I’m not sure why they bothered me this last time, but I’m going to wait a while before reintroducing them. I’m disappointed — I really loved that lasagna.

Cane sugar
While I have limited cane sugar, I haven’t eliminated it altogether. From time to time I indulge in Enjoy Life’s dark chocolate chips or Justin’s nut butters (especially the hazelnut).

Alcohol
I enjoy an occasional glass of wine, though I did avoid alcohol last summer during my GAPS diet experiment. I’ve only had a few glasses while tackling my health issues, and if I need to avoid it again in the future, I’ll do so.

So how did I arrive at the lists above?!

Gluten, dairy, and soy free

It wasn’t until I was 27 that I was told to try removing gluten, dairy, and soy from my diet. When I did, bloating subsided, I lost weight, and I had more energy. If people asked how I could possibly give up pizza, ice cream, pastries, and other familiar foods, I think feeling and looking healthier just about covers it!

But let’s be honest. It hasn’t always been easy. In fact, I wasn’t 100% gluten, dairy, and soy free for a long time. Until 2012, I lived by an 80/20 rule, where I mostly avoided them. From time to time, I’d have a bite or two of something “special”. Sometimes I felt badly immediately afterward or a few hours later. Sometimes I didn’t feel poorly at all. And because I didn’t always feel the consequences, I was willing to gamble every once in a while for a bite of pizza, baked good, or a family member’s tempting restaurant meal.

In the fall of 2012 I started feeling sick fairly often, so I probably went by a 90/10 rule. Smart, I know.

Finally, at the beginning of 2014 I decided to eliminate gluten and dairy 100%. It was challenging at first not to even have one *tiny* bite or *super small* sip of something “special”. Over time, I found it was much easier both for me and those around me if I was 100% committed.

I know there’s been a lot of debate about whether or not non-celiac gluten sensitivity is real. Whether science supports it or not (and every month it seems like new evidence supports or refutes it), I know that I’m one of countless people who can’t eat gluten without feeling sick. Perhaps there’s an underlying issue and it’s not really all gluten’s fault. But for now, and most likely for the rest of my life, I’m not eating gluten. It’s just not worth it to me.

GAPS and Paleo-ish

Perhaps it was due to living by the 80/20 rule above, or perhaps it was inevitable, but in 2013 and 2014, I found that the list of foods I could no longer tolerate was slowly starting to grow. For a year, I removed all nuts and seeds. Oh man, did I miss nut butters.

As I became more and more sick, I looked to online resources for ideas. In a short period of time, I read numerous examples of people like me who suffered persistent GI problems but didn’t know what to blame. These folks decided to go beyond gluten free and go grain free, and they all felt much better for it.

The more I read, the more I realized that I probably suffered from leaky gut, meaning that the lining of my small intestines had been compromised. In short, my small intestines was allowing food molecules to pass through its lining and into my bloodstream, which triggered my body’s self-defense systems to fight the invaders of my bloodstream. My body began interpreting these foods as threats, which directly contributed to my growing intolerance to various foods. In order to get these food sensitivities under control, I’d first need to repair the small intestines and GI tract.

So in the summer of 2014, I abandoned my gluten free + dairy free + mostly vegetarian way of eating to start the GAPS diet (which includes a lot of meat). Since ending the 2.5 month-long GAPS experiment, my diet can best be described as paleo-ish. I don’t eat grains (even gluten-free ones), legumes (beans, lentils, peanuts), refined sugar, processed foods or refined plant oils (e.g., canola, safflower, soybean, etc.). Alcohol isn’t considered to be paleo, but I have had the occasional glass of red or white wine. Some differ on whether or not green beans and peas should be considered legumes or not for the purposes of paleo. I tolerate them just fine, so they stay! I’m happy to be paleo-ish.

Allergy testing

In the fall of 2014, I started working with an integrative medicine doctor, and one of our first orders of business was to run a food allergy test using blood samples (we used the IgG Food Antibody Assessment from Genova Diagnostics). When the results returned, I found some not-so-surprising culprits, along with two foods that I was shocked to see.

Based on my results, I needed to say goodbye to:

  • wheat, corn, oats, rice, yeast
  • clams, oysters (didn’t eat them anyway)
  • watermelon
  • mushrooms
  • coconut
  • egg whites and egg yolks
  • bayleaf, cloves, cumin, dill, horseradish, oregano

While many might think that giving up gluten or dairy would be the hardest food challenge I’ve ever taken on, it was eliminating eggs and coconut that hit me the hardest. I’d never had problems with them before (that I was aware of), and they had become a daily staple while I explored a paleo approach to eating and healing. My doctors encouraged me to remove them for 30 days and then reintroduce them with a particular schedule. Unfortunately, the reintroduction trials were unsuccessful, and I’m waiting six months until I try again.

FODMAPs

One year ago, I had no idea what a FODMAP was. In the last few months, the notion of a low-FODMAP diet has appeared numerous times in mainstream media.

I stumbled upon the concept of FODMAPs before my first appointment with the integrative medicine team. I had been pronouncing it “food-maps” in my head until my new registered dietitian (RD) said “fod” (rhymes with “nod”) “maps”. Oh yeah.

FODMAP stands for Fermentable Oligo-, Di-, Mono-saccharides And Polyols. What?!

FODMAPS are types of carbohydrates that are not digested and absorbed well. These carbs feed bacteria in our body, which then produce gas. These carbs can also contribute to pain, bloating, and motility issues (meaning things move too quickly or not at all).

I already knew that certain FODMAP-containing foods caused problems before knowing they fell under the term FODMAP. When the RD asked me to experiment with removing FODMAPs from my diet, I happily did so.

Guess what — there are SO many fruits and veggies that are high-FODMAP foods. When I went paleo, I never thought I’d need to cut back on the types of vegetables I ate. Many paleo food bloggers share gorgeous recipes with high-FODMAP foods, but I’ve learned that just because a “cheese” sauce with cauliflower or cashews sounds like a great idea, it doesn’t necessarily feel like a great idea. Trust me.

Here’s a great list of high-FODMAP foods, and if you’re wondering what’s left, here’s a list of low-FODMAP foods. Thankfully I tolerate a few high-FODMAP foods quite well and keep them in my diet.

If you’re new to FODMAPs, I think these reads from Standford Health Care, Dr. Jockers and The Paleo Mom are helpful. Dr. Sarah of The Paleo Mom includes a list of foods that are paleo friendly AND low-FODMAP. I consulted the list often when I first made the transition to paleo PLUS low-FODMAP.

Bottom line: JERF

No matter where my wellness journey takes me, my food philosophy moving forward is to “just eat real food” or “JERF”, as Sean Croxton encourages his readers and listeners. I feel better in the short term eating real, whole foods, and I’m betting they’ll help me feel better in the long run too.

Filed Under: healthyliving

  • « Previous Page
  • 1
  • 2

About Me

Welcome! I'm Heather, and I'm on a mission to restore my health through food, functional medicine, and faith. On Healthy Life Heather, I'll share the information and resources I'm using in my road to wellness in hopes that they can help you too. Oh, and if you love baking, we'll get along just fine.

Sign up and never miss a recipe or new post!

* indicates required

Search

Vitacost Healther Life Heather Discount

Copyright © 2025 Heather R Palmer LLC · All Rights Reserved · About Me · Disclaimer