Healthy Life Heather

  • Home
  • Heather
    • About Me
    • Contact
    • Disclaimer
  • Healthy Living
  • Wellness Journey
  • Resources
  • Facebook
  • Twitter
  • Instagram
  • Pinterest

Red, white, and blue 4th of July chia pudding parfait

June 24, 2015 by Heather 2 Comments

Disclosure: This page contains affiliate links.

Patriotic red, white, and blue chia pudding parfait -- perfect healthy and festive treat for the 4th of July! (paleo, dairy free, grain free, gluten free) #july4

Red, white, and blue desserts are a staple at 4th of July celebrations.

Growing up, we often made the popular “American flag” cake, decorating a 9×13 cake with blueberries, strawberries, and whipped cream to look like the flag. A time or two, I made a poke cake with red and blue jello. And it was gooood.

But now that I’m paleo-ish for health reasons (and responding poorly to paleo staples like eggs and coconut), I need to find a new patriotic dessert for the 4th of July. Enter chia pudding.

I don’t think I’d tried a chia pudding recipe until last summer, but once I did, I was hooked.

First, chia seeds are all kinds of awesome. They’re often touted for being a nutrition superstar – a good source of fiber, protein, fat, antioxidants and several vitamins and minerals. And while chia seeds are thought of as a superfood with loads of health benefits, I mostly eat them because they seem to work well for my body (happy digestion) and mind (knowing there is a safe treat helps when you’re craving a sweet).

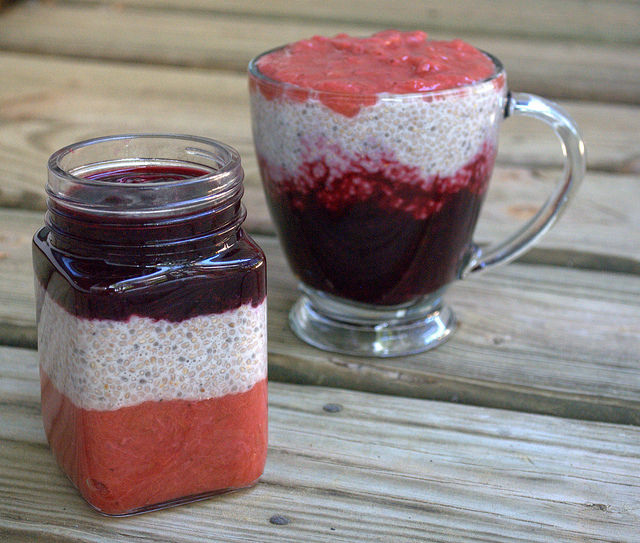
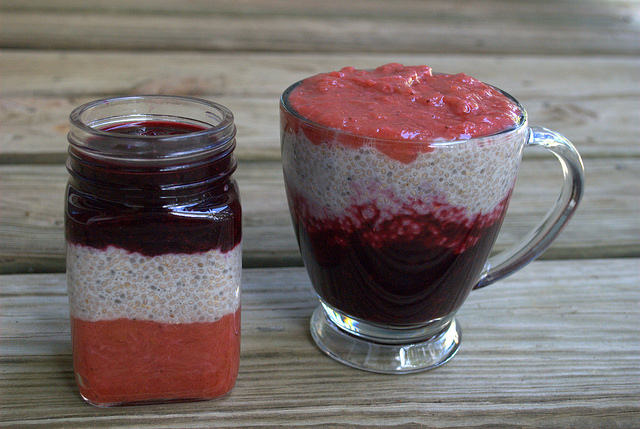
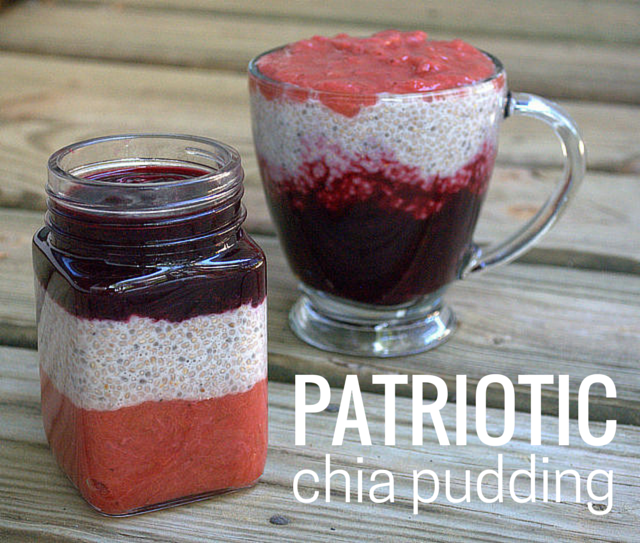
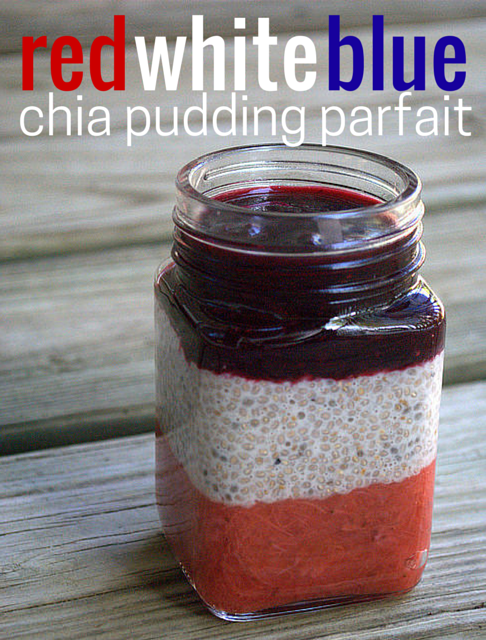
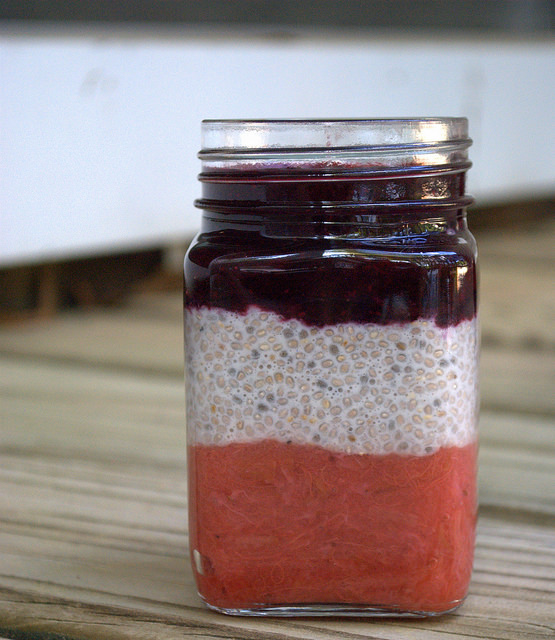
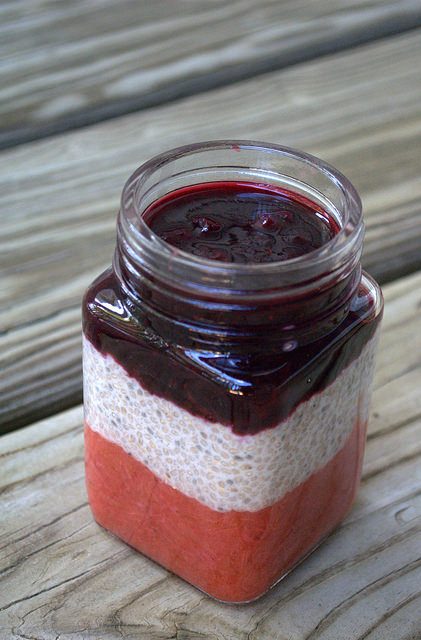
If you buy white chia seeds, chia pudding is (mostly) white. But a 4th of July chia pudding parfait isn’t a parfait without a red and blue layer! I love the late spring/early summer combo of strawberry and rhubarb, so choosing my red was easy. For the blue, I choose some beautiful plump blueberries.

If you’re looking for a healthy, festive dessert for Independence Day this year, add this red, white, and blue chia pudding parfait recipe to your menu!

Patriotic red, white, and blue chia pudding parfait -- perfect healthy and festive treat for the 4th of July! (paleo, dairy free, grain free, gluten free) #july4

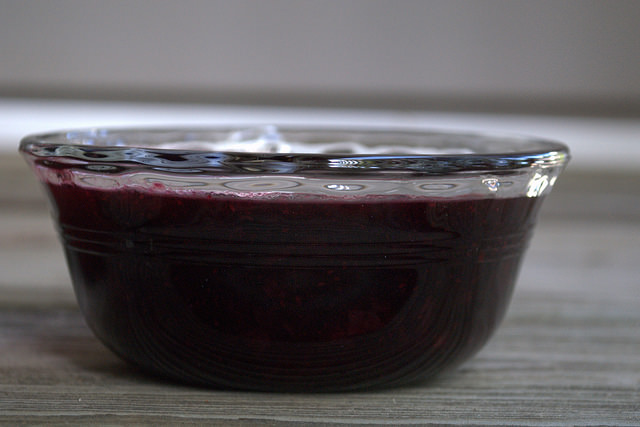
I got things going with the blue layer. Add some blueberries, water, and healthy sweetener to a pot. Cook until the berries burst, gently mash, and remove from heat to cool.

Patriotic red, white, and blue chia pudding parfait -- perfect healthy and festive treat for the 4th of July! (paleo, dairy free, grain free, gluten free) #july4

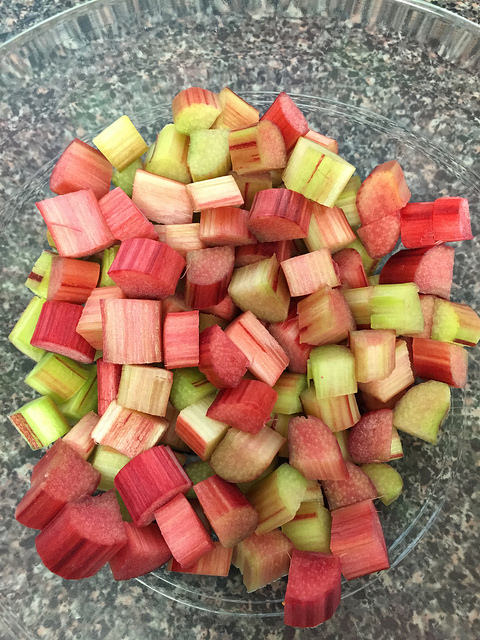
While the blueberries cooled, I prepped the red layer by coring and quartering strawberries and peeling and chopping rhubarb.

I love rhubarb!
peeled and diced rhubarb

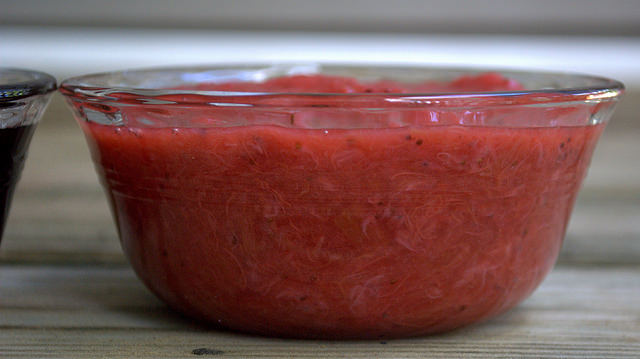
Add water and healthy sweetener (I like maple sugar) and fruit to a pan and heat until fruit is (gently) mashable.

Once the fruit layers are cooked and cooled and the chia pudding is made, you can store each layer separately in the fridge until you’re ready to layer and serve — the perfect dessert to make ahead of time! It’s so quick and easy to assemble.

Patriotic red, white, and blue chia pudding parfait -- perfect healthy and festive treat for the 4th of July! (paleo, dairy free, grain free, gluten free) #july4

Patriotic red, white, and blue chia pudding parfait -- perfect healthy and festive treat for the 4th of July! (paleo, dairy free, grain free, gluten free) #july4

Patriotic red, white, and blue chia pudding parfait -- perfect healthy and festive treat for the 4th of July! (paleo, dairy free, grain free, gluten free) #july4

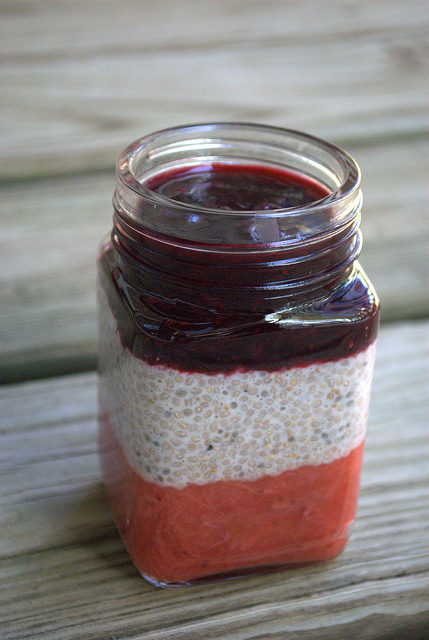
You can use any dish to serve it in, but I like reusing cute clear containers, like this one that originally contained pink salt.

Patriotic red, white, and blue chia pudding parfait -- perfect healthy and festive treat for the 4th of July! (paleo, dairy free, grain free, gluten free) #july4

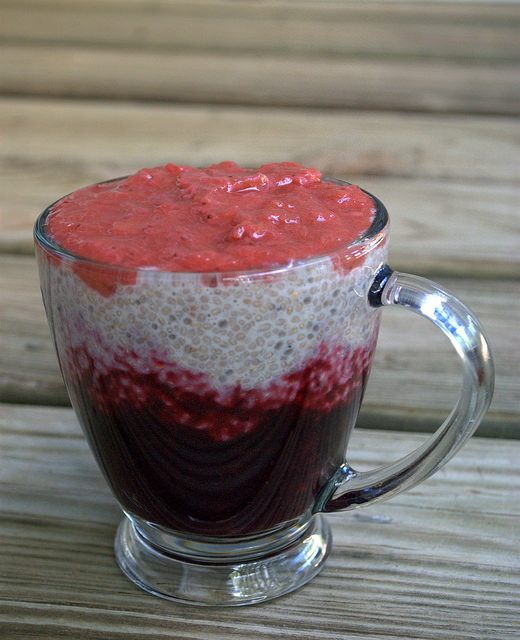
I recommend waiting to layer the parfait until you’re ready to serve — unless you’d like a cool swirl effect!

Patriotic red, white, and blue chia pudding parfait -- perfect healthy and festive treat for the 4th of July! (paleo, dairy free, grain free, gluten free) #july4


Red, white, and blue 4th of July chia pudding parfait
 
Save Print
Red, white, and blue 4th of July chia pudding parfait
Author: Heather
Serves: 3-4
Ingredients
  • For the chia pudding:
  • ½ cup chia seeds (I used white seeds)
  • 1.5 cups of non-dairy milk (I used unsweetened vanilla almond milk)
  • Optional – dash of vanilla extract and/or liquid stevia, to taste
  • For the blueberry layer:
  • 2 cups blueberries
  • 1.5 tablespoons of water
  • 2 tablespoons of sweetener (I used raw, local honey)
  • squeeze of lemon juice (I used freshly squeezed)
  • For the strawberry blueberry layer:
  • ¾ cup peeled and diced rhubarb
  • 1¼ cup of cored and quartered strawberries
  • 1.5 tablespoons of water
  • 2 tablespoons of granulated sweetener (I like maple sugar here)
  • squeeze of lemon or orange juice (I used freshly squeezed)
Instructions
  1. Mix chia seeds and non-dairy milk in bowl and refrigerate for at least an hour to allow the chia seeds to absorb some milk and the mixture to thicken. Stir occasionally. You can make this the night or day before and keep in the refrigerator (recommended).
  2. Place blueberries, water, and sweetener in a sauce pan and stir to combine. Cover with lid and heat over medium-low to medium, depending on your pan and stove top. Once blueberries begin to simmer and pop/burst, remove lid, reduce heat, and stir. Allow blueberries to simmer until all blueberries have burst and you can gently mash blueberries. Remove from heat, transfer to glass bowl, add a squeeze of lemon juice if you like, and allow to cool. Once cool, you can store in the refrigerator until you're ready to layer and serve the parfait.
  3. Next, place the peeled and diced rhubarb and the cored and quartered strawberries in a bowl. Sprinkle with granulated sweetener (I used maple sugar but coconut sugar would work well too) and allow to sit for 30 minutes. The sugar will macerate the fruit (i.e., soften, release juices, make them even more awesome).
  4. Add macerated fruit and water to a sauce pan, stir to combine, cover pan, and heat over medium-low to medium heat. Like the blueberries, once the heat begins to break down the berries, remove lid and reduce heat slightly. Stir. Allow to cook until you can mash the rhubarb gently with your spoon, about 10-15 minutes depending on your pan and heat. When done, remove from heat, transfer to glass bowl, add a squeeze of juice, and allow to cool. Once cool, refrigerate if necessary.
  5. When you're ready to layer your parfait, gather all three layers. Spoon either blueberry or strawberry rhubarb layer into clear serving dish of choice to desired amount. Next, divide the chia pudding into 3-4 servings and gently layer on top of fruit compote. Finally, gently spoon remaining fruit layer on top. You may have leftovers of fruit compote depending on the size of your serving dishes.
  6. Serve immediately or refrigerate until ready to serve. Depending on the thickness of each layer and your serving dish, the layers may sneak into one another.
  7. Enjoy and celebrate Independence Day!
3.3.3070


What’s on your holiday menu this 4th of July? If you make this red, white, and blue chia pudding parfait, let me know in the comments! Happy eating and happy Independence Day!

Patriotic red, white, and blue chia pudding parfait -- perfect healthy and festive treat for the 4th of July! (paleo, dairy free, grain free, gluten free) #july4

Patriotic red, white, and blue chia pudding parfait -- perfect healthy and festive treat for the 4th of July! (paleo, dairy free, grain free, gluten free) #july4

Filed Under: healthyliving Tagged With: recipe

Quick paleo breakfast recipe: Paleo breakfast bowl

June 16, 2015 by Heather Leave a Comment

Disclosure: This page contains affiliate links.
Quick Paleo Breakfast Recipe -- my favorite morning breakfast bowl filled with organic veggies, sausage, winter squash, greens, & healthy fat. Easy to make and easy to modify with different veggies, meats, herbs, and spices! #paleo #breakfast #eggfree #noeggs

I don’t know about you, but when I think “breakfast”, I think “bread”.

For most of my life, breakfast involved cereal, oats, sliced bread, muffins, waffles, pancakes, bagels, and granola bars. When I learned about my sensitivity to gluten, I found or made gluten free substitutes for typical bread-based breakfast items. Because breakfast = familiar, comforting carbs.

But what happens when grains are off the table altogether?

When I gave up grains last summer, I created a morning rotation of smoothies, chia pudding, eggs (scrambled, fried, casseroles), and coconut flour muffins. I enjoyed the variety but missed having eggs on toast, gluten free cereal, and goodies made from oats (or oat flour).

And then one day, things got even trickier.

I met with my new integrative medicine doctor to review the results of my allergy test. Allergic to egg yolks. Allergic to egg whites. Allergic to coconut. Shocked.

Eggs and coconut (oil, flour, milk) had been a daily staple during the GAPS diet and my transition to everyday paleo. I had no idea they may have been contributing to my digestive woes, but shortly after removing them (and other offending foods), I started to have some good days.

At first I was at a loss of what to eat for breakfast. After all, before GAPS and paleo, I’d enjoyed eating meals that were gluten free, dairy free, and 90% vegetarian. Since GAPS and paleo meant including significantly more meat into my life, breakfast had been the one meal of the day that I kept meat-free.

Giving up eggs and coconut was the most challenging dietary change I’ve made in the last year, but a few week after receiving the allergy test results, I settled into a breakfast rhythm. For the last 9 months, I’ve prepared what I call my “paleo breakfast bowl” 4 mornings per week. It’s easy to make! And perhaps more importantly, it’s easy to modify. When your food choices are limited, you have to find a way to liven things up.

Quick paleo breakfast recipe: my fave breakfast bowl

Quick paleo breakfast recipe filled with organic veggies, sausage, winter squash, and greens.

My favorite go-to breakfast bowl uses 5 key ingredients with bonus herbs and spices. It’s quick and easy. Let’s get started.

First, I warm 1-2 tablespoons of tallow or leaf lard (bonus: both are from pastured, local sources) in a pan over medium heat until melted.

Next, I add 1/3 of a bag of Whole Foods Mediterranean Blend organic frozen vegetables to the pan. This is the only blend I’ve found where all of the veggies are safe for me and I LOVE it. Although I eat a low FODMAP diet, I seem to tolerate onions quite well. Peas and green beans are considered legumes, but I also do well with small amounts of both, and if Paleo Magazine says peas and green beans are paleo-friendly, I’m not going to argue. Above all, I feel great with this blend of veggies, so it stays!

Quick paleo breakfast recipe filled with organic veggies, sausage, winter squash, and greens.

Once the veggies have been in for a couple of minutes, I add in 3-4 ounces of meat. I choose pre-cooked sausages with little to no sugar (cut into bite-sized pieces below) or use ground meat with no sugar or seasonings. If using raw ground meat, I make sure it’s cooked through before adding additional ingredients.

Quick paleo breakfast recipe filled with organic veggies, sausage, winter squash, and greens.

Once the veggies and sausage are warmed through, I add 1/4 to 1/2 cup of roasted winter squash. I’ve found that roasted squash keeps well in the fridge for several days, so I roast a butternut or acorn squash one night and then use it for four mornings in a row in my breakfast bowl. Add salt (I use and love Himalayan pink salt)
and pepper to taste here, along with any other herbs and spices you enjoy. My go-to add-ins are dried basil and thyme, but I also like sage, paprika, or garlic powder.

Quick paleo breakfast recipe filled with organic veggies, sausage, winter squash, and greens.

I give the squash a minute or two to warm up before adding in a large handful or two of organic spinach. I’ll stir everything together until the spinach is wilted to my liking — about one minute.

Quick paleo breakfast recipe filled with organic veggies, sausage, winter squash, and greens.

Scoop everything into a bowl and you have a breakfast with healthy fat, protein, veggies, carbs, and flavor. Not a bad way to start the day.

Quick paleo breakfast recipe filled with organic veggies, sausage, winter squash, and greens.

I usually add 1/4 teaspoon of turmeric powder to my breakfast bowl, as it’s anti-inflammatory, aids digestion, and benefits the body in so many ways. I also attempt to hide the 1/4 teaspoon of kelp powder I take daily (doctor’s orders) in my breakfast bowl.

Quick paleo breakfast recipe: Paleo breakfast bowl
 
Save Print
Prep time
5 mins
Cook time
10 mins
Total time
15 mins
 
Quick and easy paleo breakfast bowl
Author: Heather
Serves: 1
Ingredients
  • 1-2 tablespoons cooking fat of choice
  • ½ cup of frozen veggies
  • 3-4 ounces of meat of choice (look at ingredients to avoid added sugar)
  • ¼ to ½ cup cooked winter squash
  • Salt and pepper, to taste
  • Herbs and spices of choice, to taste
Instructions
  1. Heat 1-2 tablespoons of cooking fat of choice over medium-low to medium heat, depending on your stovetop and pan.
  2. Add frozen veggies to pan and stir occasionally, cooking until veggies are soft and slightly warmed through. This may take 5-7 minutes.
  3. Add in meat of choice (I like slicing sausages into bite-sized pieces). If using pre-cooked sausage, heat until warmed through. If using raw meat, stir occasionally and cook until no longer pink.
  4. Add in pre-cooked winter squash of choice or cooked sweet potato if you tolerate it.
  5. Add salt, pepper, herbs, and spices of choice. I usually use a pink of salt and papper and ⅛-1/4 teaspoon of herbs or spices.
  6. Once meat is warmed through (or cooked for raw) and veggies and squash are warm, add in a large handful of spinach. Stir until wilted to your liking.
  7. Spoon meat and veggies into bowl. Grab your fork. Enjoy your paleo breakfast bowl.
3.3.3070

Ready to make your own breakfast bowl? Share your favorite ingredients and modifications in the comments.

Quick paleo breakfast recipe filled with organic veggies, sausage, winter squash, and greens.

Filed Under: healthyliving Tagged With: recipe

3 ways to cook butternut squash

March 17, 2015 by Heather Leave a Comment

Disclosure: This page contains affiliate links.

3 ways to cook butternut squash

I never thought I’d say it, but butternut squash is one of my favorite foods. Maybe in the top 10.

Butternut squash (oven-roasted, bite-sized, puréed, sweet, savory, you name it) has been a staple in my diet since starting the GAPS diet and then transitioning to Paleo(ish) in the summer of 2014. Since last May, there’s probably only been 10-15 days where I haven’t had eaten butternut squash in some form during the course of the day.

But I wasn’t always a butternut squash fan. In fact, I didn’t even know what it was until I lived in Australia for a year. Even then it took me months to learn that what Aussies called “pumpkin” (or sometimes “butternut pumpkin”) was what we’d call “butternut squash” in the USA. When I returned home after the year in Australia, I ate butternut squash occasionally but still MUCH preferred sweet potatoes as my slightly sweet starchy carb of choice.

And then the health problems hit and hit hard. While researching my symptoms and various diets, I decided that sweet potatoes would sadly have to sit on the sidelines for a while. Butternut squash became my primary source of carbs, and other than bananas, it continues to be my main source of carbs nearly nine months later. Over time, I’ve found different ways of incorporating it into meals and snacks, and I hope it’s never taken off the list of foods I’m able to eat!

Recently a few friends and family members who are exploring Paleo, eating less processed foods, or simply seeing me post about butternut squash on Facebook all of the time asked how I prepare it. After nine months of buying one to three butternut squash per week, I realized I take for granted how easy it is to prep and cook! I’m going to share three methods I’ve tried, along with recipes featuring some of my favorite ways to get my daily butternut fix.

Learn 3 different ways to cook butternut squash, including a version with no slicing or dicing!

How to roast butternut squash (halves)

Without a doubt, slicing a butternut squash in half and roasting the two halves in the oven is my favorite way to prepare butternut squash. It works for just about any recipe and requires the least amount of time from start to finish of all three methods.

Slicing through them isn’t always easy, however, especially if you don’t own a good knife. If you can only invest in a couple of new kitchen items, get a good knife. It’ll make your life SO much easier (as will a husband who does 90% of winter squash prep — he’s our hand and knife model below).

1. Grab your butternut squash, knife, and cutting board of choice.
2. Slice the top and bottom off and stand the butternut squash vertically with the larger, bulbous end on the cutting board.
3. Slice the butternut squash in half lengthwise.

"Oven-roasted butternut squash halves -- slice in half, scoop out seeds, brush with oil, place face down on baking tray, and bake

Congrats! The hard part is done.

Oven-roasted butternut squash halves -- slice in half, scoop out seeds, brush with oil, place face down on baking tray, and bake

4. Scoop out the seeds (like you would with a carving pumpkin for Halloween). I use a large soup spoon.

Oven-roasted butternut squash halves -- slice in half, scoop out seeds, brush with oil, place face down on baking tray, and bake

5. Brush both halves lightly with olive oil (or cooking fat of choice) and lay face down on a baking tray lined with parchment paper (we use this one).

6. Place tray into an oven pre-heated to 375 F. Cook time will vary based on the size of your squash. We usually set the timer for 40-45 minutes, check the squash, and add on 5-minute increments as necessary. Your squash is done when you can easily pierce it through with a knife.

7. Allow the squash to cool enough to handle. Scoop out flesh and use as directed by your recipe of choice. We’ve been LOVING the butternut squash sauce in this Creamy Sausage and Butternut Squash Spaghetti (using spaghetti squash). Instead of cubing the butternut squash as directed by the recipe, we just use the flesh from roasted halves, as it all gets blended for the sauce anyway!

Peel, cut, cube, and roast butternut squash

Although time consuming, slicing a butternut squash into cubes is a popular method. You can enjoy the bite-sized roasted squash pieces as a side dish, on top of a salad, in soups or stews, or countless other recipes.

We’ve tried several ways of prepping the squash before peeling and cubing and this is what works best for us.

1. Begin as we did with the butternut squash halves — slice off the top and bottom, cut in half lengthwise, and scoop out the seeds.
2. Place each half face down on a cutting board and peel/scrape/cut the skin away, removing as little flesh as possible.

Cut and peel butternut squash, cut into cubes, add oil and herbs of choice, and roast in the oven for a delicious side dish or salad topping

It may take a while to get to a naked half, but once you’ve done it, you’re half way there!

Cut and peel butternut squash, cut into cubes, add oil and herbs of choice, and roast in the oven for a delicious side dish or salad topping

3. Cut the butternut squash into cubes or randomly sized chunks. I prefer fairly small 1/2 inch cubes. They cook faster and get a nice caramelization on them.
4. Toss with olive oil (or cooking fat of choice) and season with salt and pepper (to taste) and any other herbs or spices you like.
5. Spread evenly over a baking tray lined with parchment paper and bake at 375 F. We cooked the gorgeous bites below for 35 minutes. Stir/flip the pieces at least once during roasting for a more even cook and color.

Cut and peel butternut squash, cut into cubes, add oil and herbs of choice, and roast in the oven for a delicious side dish or salad topping

We topped a spinach salad with the butternut pieces above, but at the moment my favorite bite-sized butternut recipe is this roasted butternut squash with paprika and turmeric. YUM.

Roast a whole butternut squash in the oven

If you’re not up for peeling, cubing, or even slicing a butternut squash, this is the method for you.

1. Pierce your butternut squash with a large knife in 3-5 spots (depending on the size).
2. Place on a baking tray lined with parchment paper and pop into an oven preheated to 375 F.

How to cook a whole butternut squash in the oven -- no cutting until it has cooked!

3. Rotate the squash every 20 minutes or so to achieve a more even cook and avoid burning the bottom.
4. The first time we tried this method, we took our butternut out at 65 minutes, thinking it was ready. While cooked through, it wasn’t as soft as I would like. I recommend setting your timer for 1 hour for a smaller squash and adding 5-minute increments as necessary. You may need up to 90 minutes for a larger squash.

How to cook a whole butternut squash in the oven -- no cutting until it has cooked!

5. Allow the cooked squash to cool enough to handle and slice in half. Scoop out the seeds. Remove flesh and use in recipe of choice.

How to cook a whole butternut squash in the oven -- no cutting until it has cooked!

I added the butternut above to a food processor and used the mash/puree to top my favorite winter squash shepherd’s pie recipe (which I make with several modifications for my food allergies + intolerances).

Roasted butternut squash
 
Save Print
Prep time
5 mins
Cook time
40 mins
Total time
45 mins
 
My favorite way to prepare butternut squash -- roasted halves.
Author: Heather
Ingredients
  • 1 butternut squash
  • 2-3 teaspoons of liquid/melted cooking fat (I use olive oil)
Instructions
  1. Preheat oven to 375 F.
  2. Grab your butternut squash, knife, and cutting board of choice.
  3. Place the butternut squash on the cutting board length wise and slice the top and bottom off (about ¼ to ½ inch, just enough to remove the stalk).
  4. Stand the butternut squash vertically with the larger, bulbous end on the cutting board. Slice the butternut squash in half lengthwise.
  5. Scoop out the seeds (like you would with a carving pumpkin for Halloween).
  6. Brush both halves lightly with olive oil (or cooking fat of choice) and lay face down on a baking tray lined with parchment paper.
  7. Place tray into pre-heated oven. Cook time will vary based on the size of your squash. For a medium-size squash, I recommend setting the timer for 40-45 minutes. Then, check the squash and add on 5-minute increments as necessary. Your squash is done when you can easily pierce it through with a knife.
  8. Remove from oven when done and allow the squash to rest until it's cool enough to handle.
  9. Scoop out flesh and enjoy in your recipe of choice.
3.3.3070

If you’ve never cooked a butternut squash, I hope you’ll use one of the methods above and roast one soon! If you’re a fellow butternut squash fan, what’s your favorite method? Any recipes you absolutely LOVE?

Learn 3 different ways to cook butternut squash, including a version with no slicing or dicing!

Filed Under: healthyliving Tagged With: recipe

About Me

Welcome! I'm Heather, and I'm on a mission to restore my health through food, functional medicine, and faith. On Healthy Life Heather, I'll share the information and resources I'm using in my road to wellness in hopes that they can help you too. Oh, and if you love baking, we'll get along just fine.

Sign up and never miss a recipe or new post!

* indicates required

Search

Vitacost Healther Life Heather Discount

Copyright © 2025 Heather R Palmer LLC · All Rights Reserved · About Me · Disclaimer